Sunday, March 7, 2021

Tail Weaves in Stockinette Stitch

 Tail weaves should be unobtrusive. They should be elastic. This means that the fabric is able to be stretched in the area where the tails are woven. The tails should not pop out when the fabric is stretched. And, they should not be visible on the public side of the fabric. Below are the preferred methods for weaving in tails in several common fabrics.

If possible, weave the tails into a seam by going back and forth through the seam several times. This is one reason it’s often recommended to start a new yarn at the beginning of a row. For the Master Hand Knitting Program do not weave tails into any seams for the swatches. On projects, yes, you can weave tails neatly into seams.  

If your project is seamless or for some reason you don't want to use the edge of your project, you will need to weave the tails into the fabric.

Stockinette Stitch

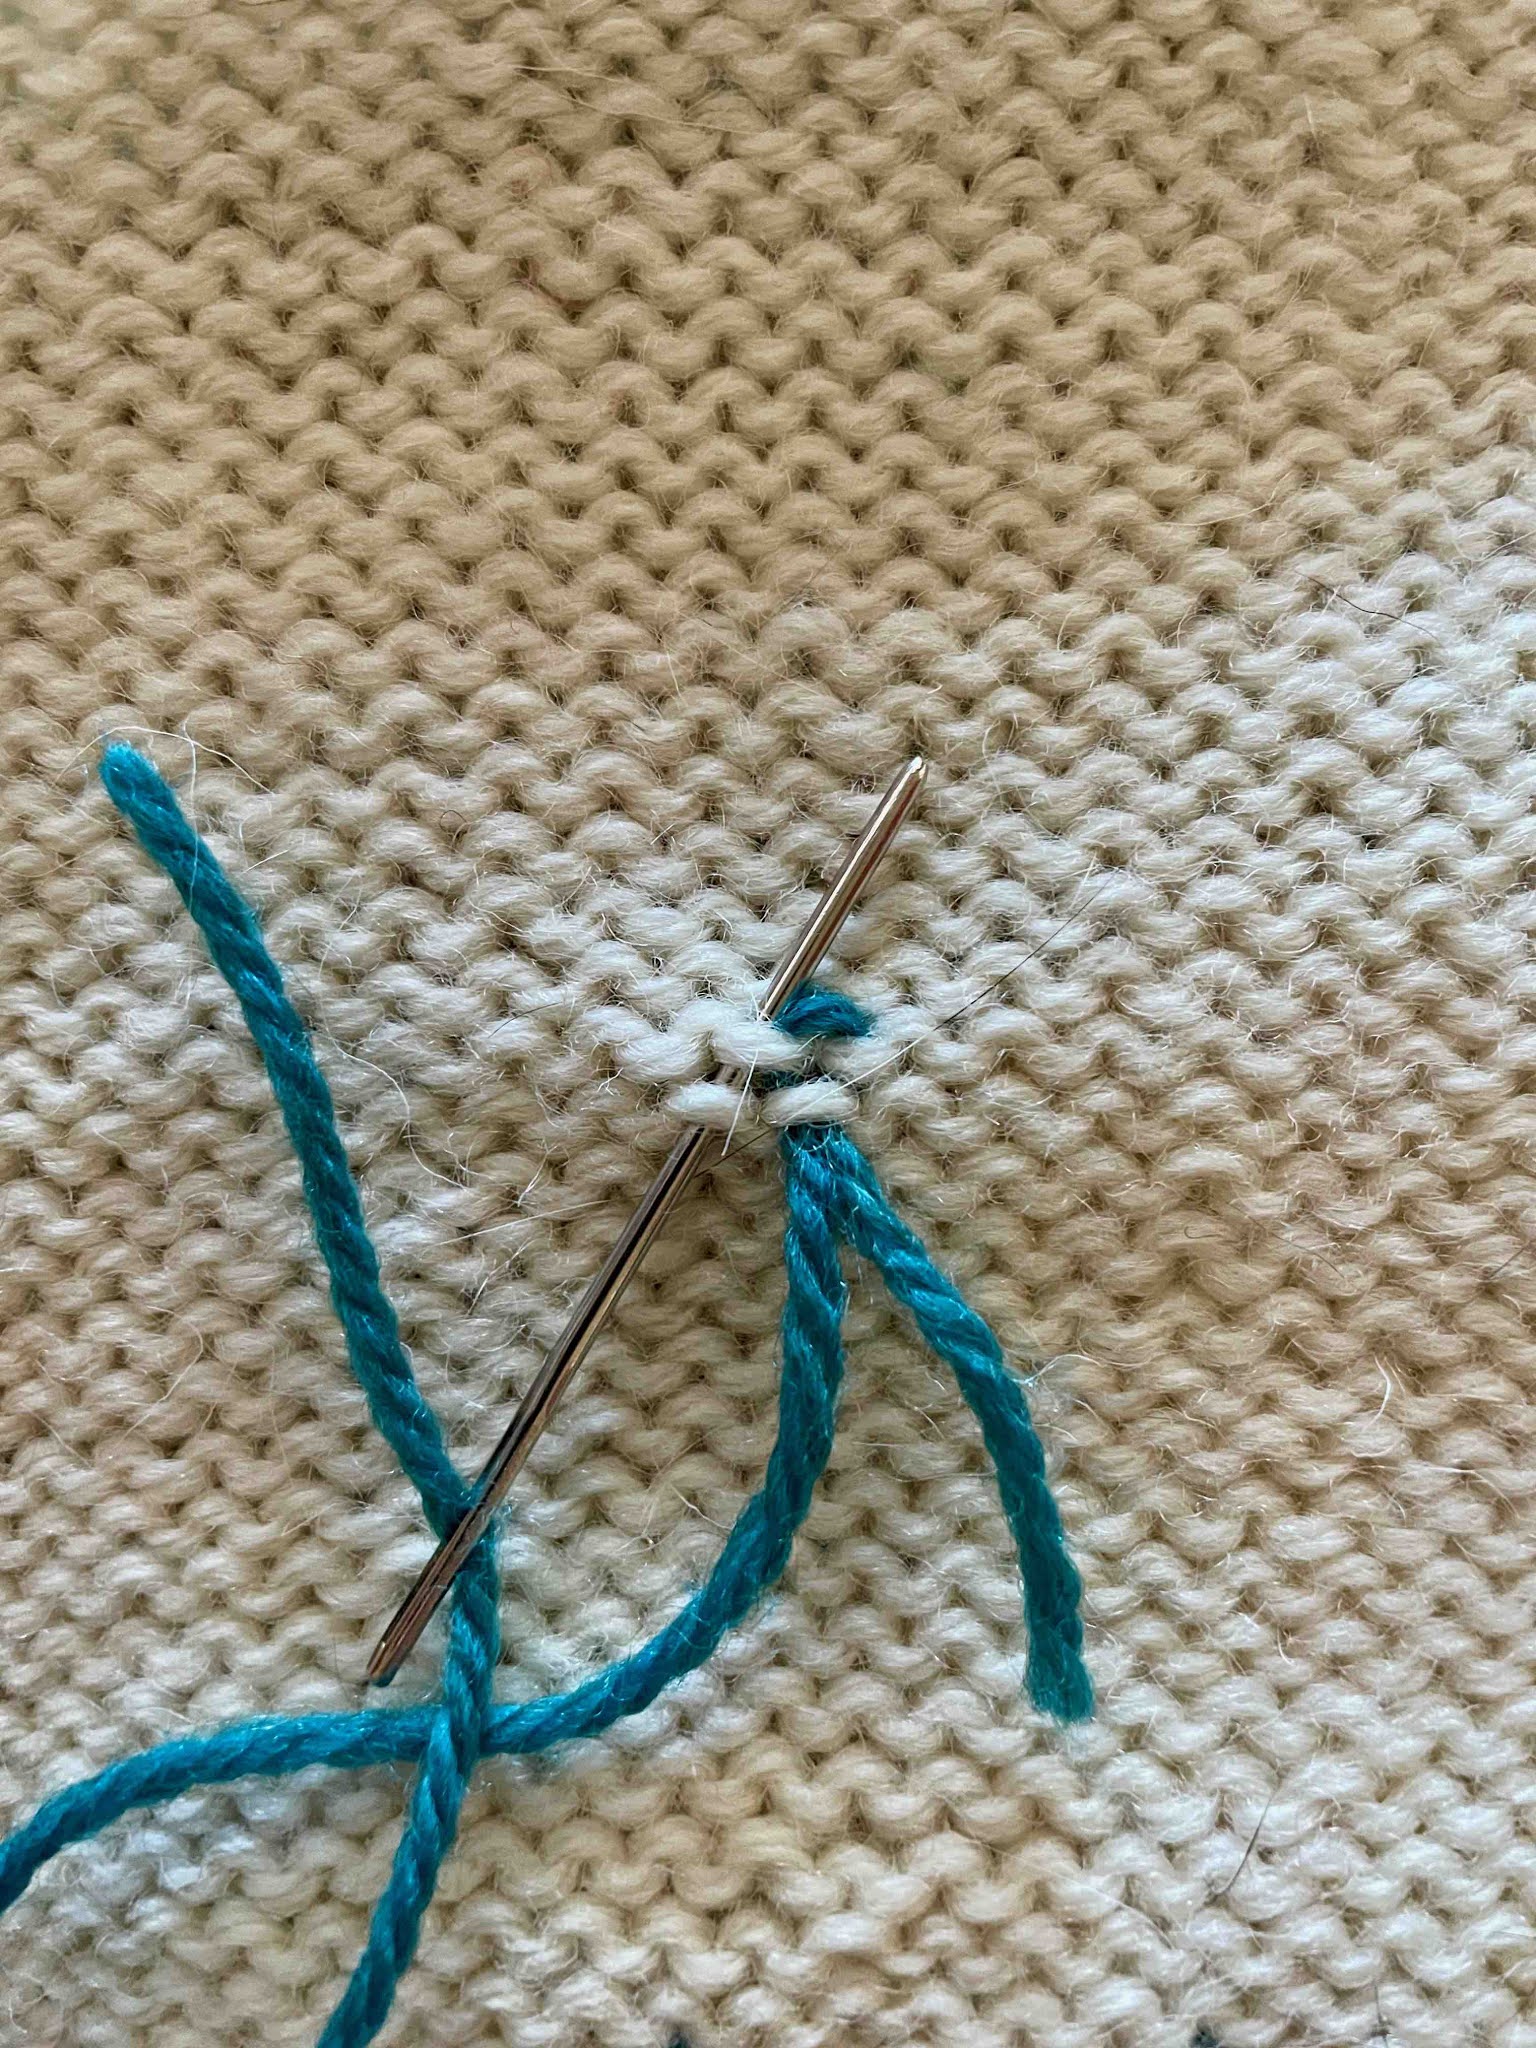
The absolute best tail weave for stockinette is duplicate stitch done on the wrong side. It can be difficult to grasp at first, but once you understand the track that the yarn takes, you will probably use this tail weave on all your stockinette projects.

Here is what duplicate stitch looks like on the purl side of the fabric.


I've left the ends long, so that you can see where they start and end. For your work, cut the ends close to the fabric. 


How to duplicate stitch tails in stockinette:


The tail weave will cover the “frown” under the black pointer, then the “smile” above the red pointer, then the “frown” under the blue pointer. The weave can continue in this manner for as long as needed.


1 Go under the frown and smile covered by the thinner arrow.


2 Go under the smile then frown covered by the thinner arrow.


3 Go under the frown then smile covered by the thinner arrow.


4 Go under the smile then frown covered by the thinner arrow.


Continue in this manner.


How it looks with needle and yarn: 


1 Go under the frown and smile.


 2 Go under the smile then frown.


3 Go under the frown then smile.


4 Go under the smile then frown.


 Go under the frown and smile.


 Continue in this manner.

Tuesday, January 26, 2021

What is Mirroring in Knitting?

 In knitting it is visually appealing to mirror increases and decreases. Other elements should mirror as well.

What is a mirror image? A mirror image is a reflected duplication of an object that appears identical but is reversed perpendicular using the center as the dividing point. In essence right and left are reversed.

So to mirror decreases and increases that appear at the start and end of a row, three things must happen.
1. The slant of the decreases or increases should be in opposite directions.
2. There should be the same number of stitches between the selvedge and each decrease/increase.
3. There should be same number of stitches between each decrease/increase and the center.

Below are some charted examples of decreases: 


Above: The decreases are blended. Notice the slant in opposite directions and are equidistant from the edges.


Above: The first chart has the decreases slanting opposite, but they are not equidistant from the edges. In the second example they are equidistant from the edges but they are not slanting in opposite directions. 

What about the bar increase?  Since it has no slant, that part of the definition is taken out. The "bar" is visible, therefore to mirror the increase, there would need to be the same number of whole stitches before the first bar and after the last bar. Here is a post that explains how to do this.


To mirror within motifs, again the same idea applies. To mirror motifs, the same idea applies.  Below are some examples of how to mirror within motifs:


Above: The top motif shows decreases that are not mirrored while the lower motif shows mirrored decreases.  Here we really see the symmetry that is needed to create mirroring. 


And finally, above we see motifs that mirror within themselves and to each other. 


Mirroring is part of balance and visual harmony.

Wednesday, January 20, 2021

Considerations When Making Yarn Substitutions

Qualities of the Original Yarn:

--Gauge and Yarn weight
Usually, the gauge can be matched by using a yarn from the same category on the CYCA “Standard Yarn Weight System.”  Yarn weight refers to the thickness of a yarn. The CYCA yarn standards categorize yarn based on wpi or wraps per inch and ypp or yards per pound.

For worsted weight yarn(#4):  Using the yarn from the pattern, determine the number of yards per 50 grams; figure 15%.  Look at the yarn you want to substitute and figure the number of yards per 50 grams.  If this number is within 15% higher or lower than the original yarn, it is probably a good match.
For fingering ( #1), sock (#2) and  dk weight (#3) figure 20%. For bulky (#5) and super bulky (#6), figure 10%.


To determine the approximate gauge a yarn will knit when two strands are held together (doubled):  multiply the stitches per 4 inches listed on the ball band by .73 (or 73 %).  Remember you will need to double the amount of yardage that you buy.


--Fiber
Fiber content will influence how a yarn looks when knitted. Substituting a yarn with similar fiber content and structure will help obtain a fabric similar to the original. Animal, plant and synthetic fibers all have unique characteristics. All yarns will have specific qualities depending on their source.
--Ply
Compare the ply of the substitute yarn and the original yarn. Ply affects a yarn’s balance. Single ply and various multiple ply yarns will all work up differently. Even the direction of the ply (Z or S) will affect a fabric’s look.
--Texture
Determine if the item being made needs a certain texture for the yarn. Smooth yarns will highlight stitch work better.  Other textures include slubby, boucle, haloed eyelash, and thick and thin yarn.
--Drape
Fiber, ply, texture and gauge will all affect the eventual drape of the fabric. Drape is a description of the firmness of the knitted fabric. Decide on how flexible or stiff the finished fabric should be and choose a yarn with a fiber, texture and ply worked at a set gauge that creates this drape.

Other Considerations:
Use
- Stranding, steeking, felting, lace, cabling.....
Color- Check that colors will work with stitch pattern and/ or written pattern. Check for bleeding.
The Recipient- Consider preferences, allergies, cost, and care.

Work a Swatch
Make a swatch that is at least four inches by four inches. Include stitch or color patterns from the pattern. While working the swatch look for any potential problems and see how the yarn feels to your hand. Check the gauge.  Block the swatch. Check the gauge again. Blocking will also give you an idea of how the yarn launders.   See the post on how to measure gauge.

Buy the Right Amount:
Using the original, yarn multiply the yards per ball by the number of balls needed for the pattern.  This gives the total yardage necessary.  Take this number and divide it by the yardage per ball of the new yarn to find the number of balls needed.  Consider getting extra yardage, you never know if you will need it.

# of yds on original ball of yarn  x  # of balls needed for size on pattern ÷ # yds on substitute ball of yarn = # of balls needed of substitute yarn.


Tuesday, January 19, 2021

The Bar Increase or Kfb (Knit in the front and back)

 The Bar Increase is considered decorative in some fabrics and blended in other fabrics. It is abbreviated-- kfb because you knit into the front and then the back of a stitch. This creates a small bar to the left of the stitch, which is visible in stockinette making it decorative. It is less noticeable or blended when strategically placed in ribbing, or when used in garter stitch because the bar blends in with adjacent purl stitches. Depending on where you place the increase, it can also blend in with seed stitch and other pattern stitches. Always swatch to see what the increase will look like and to find the best place to put it.

The increase is simple to work. Insert the right needle into the next stitch as if you were going to knit it. Wrap the stitch as if you are going to knit it. Pull the loop through, but do not remove the stitch from the left needle. Take the right needle and insert it into the back of the same stitch. Wrap the stitch again and pull the loop through. Remove the original stitch from the left needle.

Below the photos show the bar increase in both stockinette and ribbing.


When placing this increase on opposite selvedges, it's important to mirror the increases. Mirroring means that there will be the same number of stitches before the bar on the right side and after the bar on the left side. To do this: On the right side work the number of whole stitches desired minus 1. In the next stitch work the bar increase (kfb). Since the bar appears to the left the whole stitch will appear to the right of the bar. On the left side work to the desired number of stitches wanted after the bar plus 1. Work the bar increase. Since the bar is to the left of the stitch, the remaining stitches will need to be the desired number.

Example: You want 2 stitches at each selvedge between the edge and the bar. On the right: Knit 1, kfb into the second stitch.  On the left: Knit until 3 stitches remain, kfb into the third from the end. 2 stitchess will remain. 

There is a small hole that appears below the bar. To mitigate this, don't work too tightly. When manipulating fabric close to the edge is it also common to have tension issues or guttering, so take care to manage your selvedge tension on these rows.

Friday, December 18, 2020

Accurately Calculate Stitch Gauge

I have read so many ways to calculate gauge, it sometimes makes my head spin. In this blog post, I am going to describe how to ACCURATELY measure gauge. And how to use these numbers.

Most knitters make a gauge swatch then count the number of stitches in 4" or even 1".  But this method isn't really accurate. 

How to Measure Gauge.

For basic fabrics of 1 to 2 st multiples where stitches are easily identified.

First make a gauge swatch that is at least 4".    

Using Marking threads, mark a set of stitches. Do not include selvedge stitches. If marking a gauge swatch, you will measure along the center horizontal. Here is an example in Seed Stitch that is marked for measuring stitch gauge.


.


Marking threads can also be placed to measure rows. Don't include any cast on or bind off rows.


Be sure the marking threads are thinner than the project yarn and that you place them between stitches. 


Count the stitches between the threads and then measure the distance between the marking threads. Measure to the closest ⅛ inch. On the example below there are 21 stitches measuring 4 ⅛”.


Convert the fraction to a decimal.
(1⁄8 = .125, 1/4 = .25, 3⁄8 = .375, 1⁄2 = .5, 5⁄8 = .625, 3⁄4 = .75, 7⁄8 = .875)

In the example 4 ⅛” = 4.125”

Divide the number of stitches by the measurement.
Example: 21 ÷ 4.125 = 5.09090909090909

This gives you stitches per inch.

Uses for this measurement:
Figuring out the size of piece. — Don’t round this number.
Figuring a cast on number for a certain size. — Don’t round this number.
Figuring a ratio for seaming or picking up stitches — This number should be rounded.

If you are following a pattern or writing a gauge statement for a pattern, multiply the unrounded sts per inch by 4 to get the number of stitches per 4”.

5.09090909090909  x  4 = 20.36363636363636.  This number is rounded to the closest whole number.  For this example 20 sts = 4”.

 For fabrics with larger multiples.

A multiple is a set of stitches that repeats horizontally. There are two types of fabrics that fit this category.

The first type is a motif that runs vertically and has spacer stitches between the motifs.
The multiple for this type of pattern is the motif + one set of spacer stitches.
Below is an example. The swatch shows a cable with 2 rev st st between each cable.


Notice there must be “extra” stitches to horizontally balance these patterns. These “extra” sts should not be included when measuring gauge. Remember, the multiple is the set of sts that is repeated. So for this cable pattern there are 3 reverse stockinette sts and all of the stitches that make up the cable in each multiple. 3 reverse stockinette stitches are added at the end of the row to horizontally balance the pattern.

To measure these types of patterns, measure the most whole multiples you can. And again, measure along the center horizontal.

The second type of motif structure is a tessellated motif. In this situation, the motif moves both vertically and horizontally. Extra stitches are used to “cap” the start and end of the motif at the sides. In this situation, use all of the stitches, but don’t include any background stitches to either side or above/below the motif. 


The following is a gauge worksheet that you can use to calculate gauge. 

GAUGE WORKSHEET

Determine Stitch Gauge

Measure the width:
 (1/8 = .125, 1/4 =  .25, 3/8 = .375, 1/2 =.5, 5/8 = .625, 3/4 = .75, 7/8 = .875)

Count the number of stitches:

Divide the number of stitches by the width. This gives you the number of stitches per inch. Do not round off the number.

Number of stitches per inch:

Multiply the number of stitches per inch by 4 to get the number of stitches in four inches. Round the number up or down.

Number of stitches in four inches:

Determine Row/Round Gauge

Measure the length:
(1/8 = .125, 1/4 =  .25, 3/8 = .375, 1/2 =.5, 5/8 = .625, 3/4 = .75, 7/8 = .875)

Count the number of rows or rounds:
(Do not include the cast on or bind off edges)

Divide the number of rows/rounds by the length. This gives you the number of rows/rounds per inch. Do not round off the number.

Number of rows/rounds per inch:

Multiply the number of rows/rounds per inch by 4 to get the number of rows/rounds in four inches. Round the number up or down.

Number of rows/rounds in four inches:


If you are getting fewer stitches than the recommended gauge, try using a smaller needle size.
If you are getting more stitches than the recommended gauge, try using a larger needle size.

Once you have calculated the gauge on your unblocked swatch, block the swatch and remeasure the gauge. 

 The blocked swatch will tell you your finished gauge. But you will need to work to your unblocked swatch gauge in order to have the finished gauge match the finished gauge of your swatch once you block your project.  

Monday, January 25, 2016

The Figure 8 Join

The figure 8 join is used to join two seperate pieces of knitting so they can be seamed.

 There are three steps to the figure 8 join.

 Step 1:
 Insert the needle into the bottom of one piece either in the cast on edge or above the cast on edge from back to front.

 Step 2:
Insert the needle into the bottom of the opposite piece from back to front. If you went above the cast on in step 1, go above the cast on in step 2. If you went into the cast on in step 1 go into the cast on for step 2.

 Step 3:
Insert the needle into the exact same spot you inserted the needle in step 1 from back to front. If you fail to work the last step, you do not create a figue 8.

 Remember, as experienced knitters, it's often easy to "predict" or expect to see directions or things in patterns. And sometimes we read the directions, but our hands do something else, because subconsciously it might seem more logical or it's what we think should happen.

This is what I think happens to many people when they try to work this join.

 Common mistakes we see:

 Step one is correct, but step two the yarn is worked front to back rather than back to front. This makes a figure 0 and does not securely join the pieces.

 Step 1 and 2 are worked correctly, but in step 3 the needle is either brought up through the intial insertion poin and then under the first seaming bar. Or, the needle is brought under the first seaming bar on the original swatch.

 If you do this, you will seam the cast on row of the second swatch to the first row on the first swatch. They will be misaligned. The bottom will not lie straight.

It gets even more disasterous for seed stitch, because the rows are now off by one and if you planned to carry the pattern over the seam, you won't, unless you make a fudge somewhere by working two bars from one swatch.

 Here is a video.

Tuesday, June 23, 2015

Anchoring a Stitch for Tail Weaves and Direction Change in Duplicate Stitch

Duplicate stitch is a technique for covering already knit stitches. It's good for lines and small areas. If the area is too large the item gets bulky, so duplicate stitch wouldn't be the best technique for that area. Intarsia or Fair Isle (stranding) would be a better choice. Many knitters work forward with duplicate stitch thinking how easy it is. The reality is it is one of the more difficult of techniques to get correct. To the astute, trained, review committee eye, errors stand out. Common problems are: Poor stitch coverage Twisting of stitches at the base Splitting both the working thread and base stitches Legs at the base of an end stitch don't separate, but rather lean in the same direction This blog post deals with the last problem. End stitches that sometimes appear twisted or have both legs leaning in the same direction. The problem occurs because the tail or working yarn is brought inward towards the stitch worked in that set. The solution is to anchor the stitch to the outside stitch by splitting the outside stitch slightly and then continuing forward with the tail weave or duplicate stitch. Below is what anchored stitches look like.